
Mac notes: Zoom and Moving and resizing windows between displays
A keyboard shortcut to move any window to the opposite screen and maximum (Zoom) size
Assign the same keyboard shortcut to both “Move to” menu items and macOS turns it into a one-key toggle between displays.
If you use a laptop alongside an external monitor — or any two displays that differ in size — you already know the annoyance. You drag a window from one screen to the other and it lands at the wrong size, in the wrong spot, or half off-screen. The best is when the window is too big and you can’t grab the the corner so you need to shuffle everthing around to get to the corner (it’s like I can immediately feel the carpal tunnel kicking in).
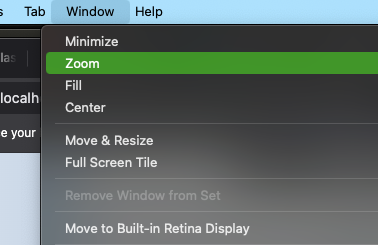
Zoom
So, today I found out about the Zoom command. It’s like kind of amazing. Backstory: I like using the whole screen, but I don’t like the takover effect. I prefer the windows to max size but that’s it. Enter Zoom. Zoom just makes the window max size without it going full screen (so it’s still a window). Love it!
In any app just find this in the Menu: Window → Zoom

Moving windows between displays
macOS has a built-in “Move to” menu item under Window, but clicking through a menu every time defeats the purpose.
The fix is a single keyboard shortcut that toggles the active window between your two displays instantly. It uses native App Shortcuts, takes about two minutes to set up, and works in every app.
How it works
macOS lists both of your displays under Window → Move to [Display Name]. If you assign the same keyboard shortcut to both entries, macOS only fires the one that actually moves the window — the entry for the other display. The result is a toggle: press the shortcut and the window jumps to whichever screen it isn’t on.
Setting it up
1. Find your exact display names
Open any app and pull down the Window menu. Near the bottom you’ll see two entries:
Move to [Your Main Display Name]Move to [Your Other Display Name]
Write down both names exactly as they appear — macOS requires a letter-for-letter match. The format is always Move to [display name], e.g. Move to DELL U2720Q or Move to Built-in Retina Display.
2. Create the first shortcut
- Open System Settings → Keyboard → Keyboard Shortcuts… → App Shortcuts.
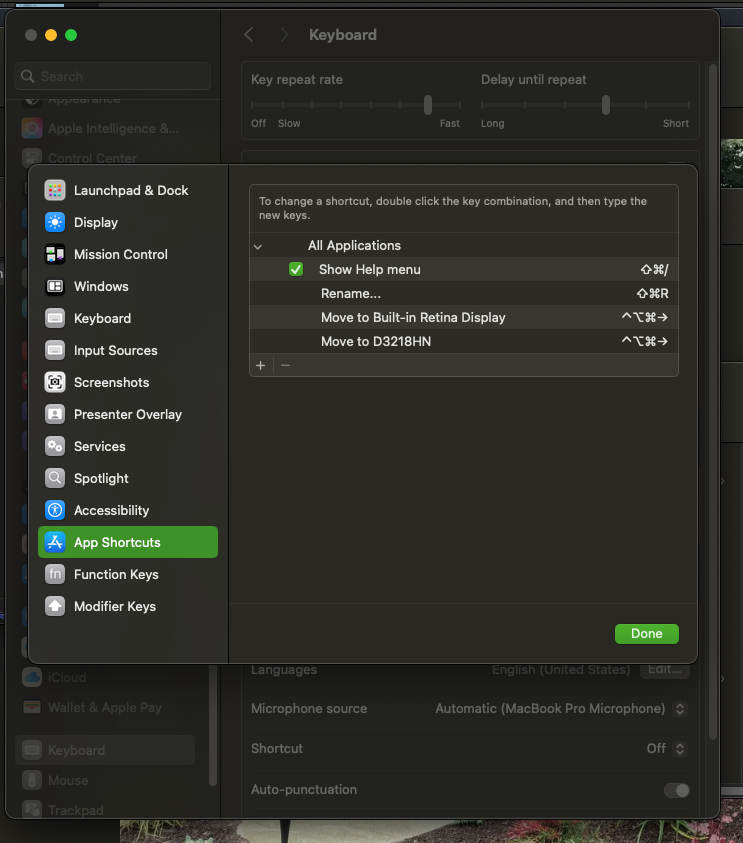
- Click the + button.
- Set Application to
All Applications. - In Menu Title, paste the exact text of the first display entry (e.g.
Move to DELL U2720Q). - Set a Keyboard Shortcut — something memorable and unused. I use
⌃⌥⌘M. - Click Add.
3. Create the second shortcut with the same keys
- Click + again immediately.
- Set Application to
All Applicationsagain. - In Menu Title, paste the exact text of the second display entry (e.g.
Move to Built-in Retina Display). - Set the same keyboard shortcut you used above (
⌃⌥⌘M). - Click Add.
That’s it. Press your shortcut in any app and the active window jumps to the other display.
Tips
- Works everywhere. Any app that exposes the
Move tomenu items responds to this shortcut — browsers, editors, Finder, Slack, you name it. - Display renames. If you swap monitors or macOS renames a display after an update, just update the two Menu Title entries to match the new names.
- Three or more displays. This two-entry trick is cleanest with exactly two displays. If you add a third, consider the free app Rectangle which offers a “Move to Next Display” action that cycles through any number of screens without maintaining display names.
Two shortcut entries, zero installs, and one hotkey that just works. It’s the kind of small automation that pays off every time you glance at the wrong screen and wish the window were somewhere else.